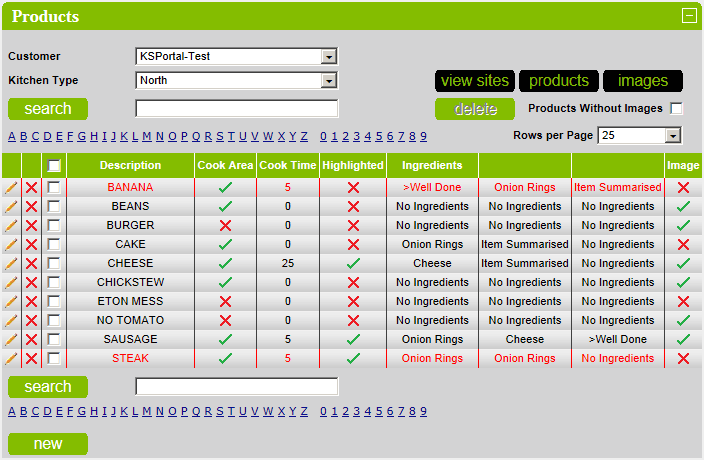
Products
This section details the maintenance of Products.
Products can optionally have one or more images linked to them.
Select the required customer and kitchen type from the dropdown lists.
Click on the view sites button to view the sites that are linked to the selected kitchen in another window.
Click on the products button to generate a spreadsheet detailing all products linked to the Kitchen.
Click on the images button to generate a spreadsheet detailing all the images that exist and which ones are
used, for the selected kitchen or customer.
Click on a search bar letter/number to display products that start with that letter/number.
Enter search text and click on the search button to display products that contain the search text in their
description.
To only display products that do not have an image assigned to them, check the Products Without Images checkbox.
Products that are inactive are displayed in red.
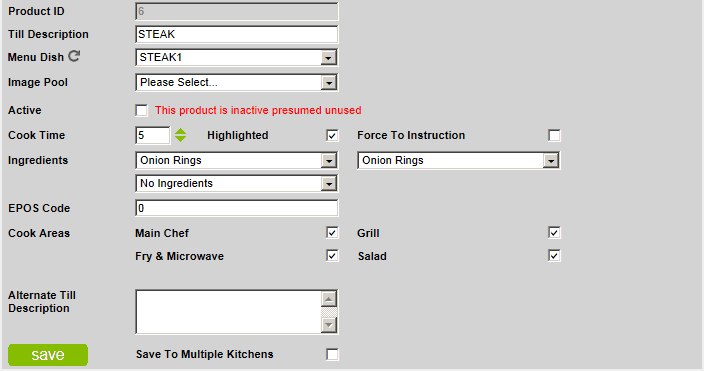
Editing an Existing Product
To edit an existing product, click on the  icon.
icon.
The product description must be unique and an error occurs if a duplicate is detected.
If the product has a linked Menu Dish then the menu dish is automatically selected from the Menu Dish
dropdown listbox.
If the product has a linked image set then the primary image is automatically selected from the Image Pool
dropdown listbox.
Modify details as required and click on the save button to save the changes.
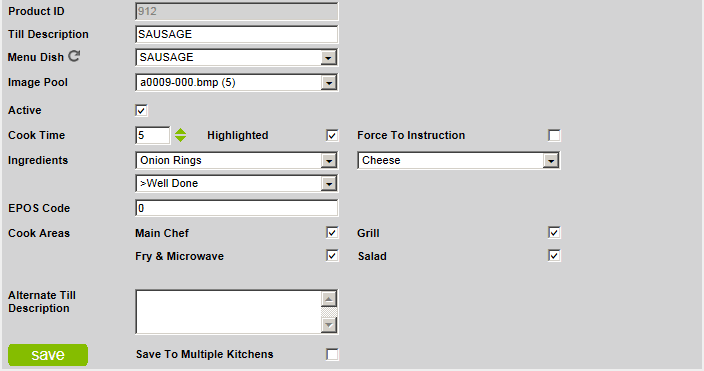
If the product has a linked image that is a thumbnail then it will be displayed.
If the product is inactive then the message This product is inactive presumed unused will be displayed.
Delete an Existing Product
To delete an existing product, click on the  icon.
icon.
To delete multiple existing products, check the checkbox next to the product description and then click on the
delete button.
Deleting a product will delete the product from the database and therefore the references to the kitchen, ingredients
and images.
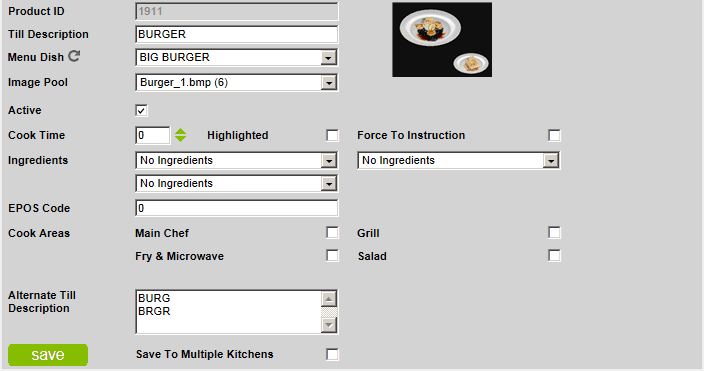
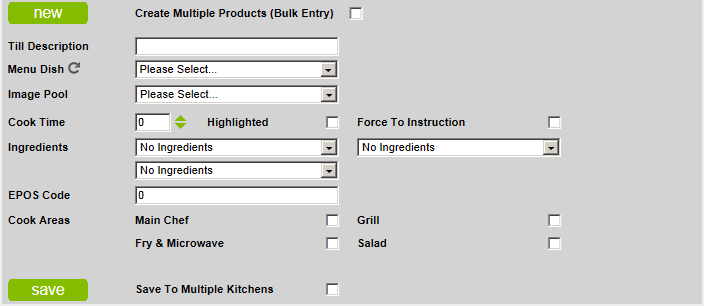
Create a New Product
To create a new product, click on the new button.
The product description must be unique and an error occurs if a duplicate is detected.
If the product has a Menu Dish then select the menu dish from the Menu Dish dropdown listbox.
If the product has a linked image set then select the primary image from the Image Pool dropdown listbox.
Enter the details as required and click on the save button to save the changes.
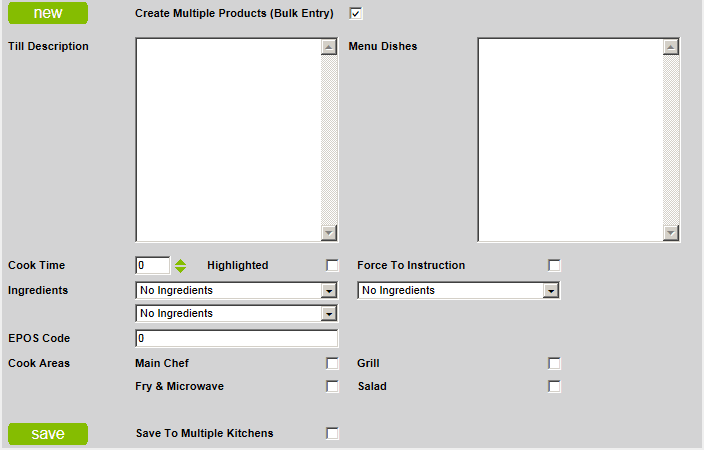
Bulk Entry
It is possible to enter in bulk with data from a spreadsheet to create new products, update the descriptions based on
EPOS codes and update the EPOS codes based on descriptions.
There must be the same number of lines both the textboxes.
Empty lines are not permitted and will result in the line being ignored.
It is not possible to link an image set in Bulk
Entry mode.
Bulk Entry - Products
To enter new products in bulk, check the Create Multiple Products (Bulk Entry) checkbox.
Paste the new till descriptions into the Till Description textbox.
Paste the new menus dishes into the Menu Dishes textbox.
Click on the save button to create all the new products.
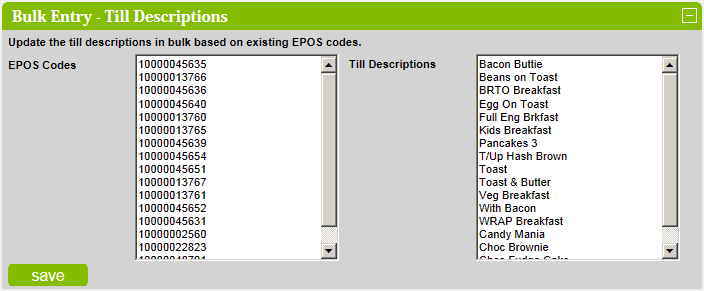
Bulk Entry - Descriptions
To update the till descriptions in bulk based on EPOS codes, click on the expandable Bulk Entry - Till Descriptions
bar to display the section.
Paste the existing EPOS codes into the EPOS Codes textbox.
Paste the new till descriptions into the Till Descriptions textbox.
Click on the save button to update the till descriptions.
If a product exists that has an EPOS code that matches an EPOS code in the EPOS Codes textbox then its till
description will be updated to match the corresponding till description from the Till Descriptions textbox.
Bulk Entry - EPOS codes
To update the EPOS codes in bulk based on till descriptions, click on the expandable Bulk Entry - EPOS Codes bar
to display the section.
Paste the existing till descriptions into the Till Descriptions textbox.
Paste the new EPOS Codes into the EPOS Codes textbox.
Click on the save button to update the EPOS codes.
If a product exists that has a till description that matches a till description in the Till Descriptions textbox then its
EPOS code will be updated to match the corresponding EPOS code from the EPOS Codes textbox.

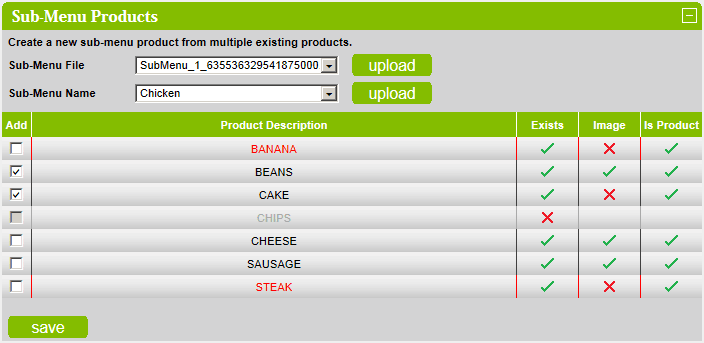
Sub-Menu Products
To create a new sub-menu product from multiple existing products, click on the expandable Sub-Menu Products bar
to display the section.
The Sub-Menu File dropdown list box lists all the matching sub-menu product files.
Select the required file from the Sub-Menu File dropdown list box and click on the upload button.

The Sub-Menu Name dropdown list box lists all the matching sub-menu names from the selected file.
Select the required sub-menu name from the Sub-Menu Name dropdown list box and click on the upload button.

All sub-menu items will be displayed.
To copy a products' images to the sub-menu product, check the required checkbox in the grid.
Once all products have been checked then click on the save button to create the sub-menu product.
if the sub-menu product already exists then it will be overwritten.
NOTES:
Existing sub-menu products are displayed in green with leading & trailing asterisks with the text EXISTS.
Inactive products are displayed in red.
Existing products show a  in the Exists column.
Products that do not exist are displayed in dark grey, have the checkbox disabled and show a  in the Exists column.
Products that have one or more images attached show a in the Image column.
Products that have no images attached show a in the Image column.
Products that are actually products as opposed to a special instruction show a in the Is Product column.
Products that are not actual products show a in the Is Product column.
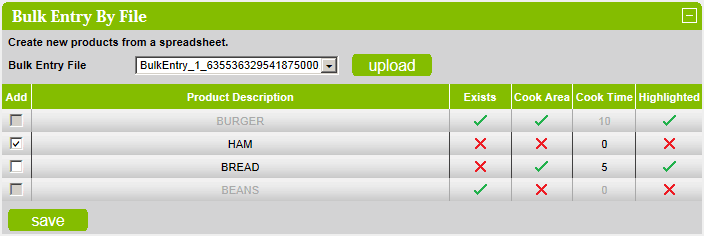
Bulk Entry by File
Check the Bulk Entry From File checkbox to create products in bulk from an import file.
Select the import file from the Bulk Entry File dropdown listbox and click the upload button.

All available products will be displayed.
To add a product, check the Add checkbox on the grid row.
Click the save button to save the selected products.